
If your Yellow Jacket stump grinder teeth seem to be wearing out after just a few jobs, replacing them again and again can get expensive. But worn teeth don’t always mean you bought a bad set. Sometimes the ground is more abrasive than you expected. Other times, the teeth aren’t cutting properly, or worn pockets are causing problems you might not notice at first. Before spending money on another set, it’s worth checking what’s actually causing the wear. Here’s what to look for and what you can do to help your stump grinder teeth last longer.

Why Do Yellow Jacket Stump Grinder Teeth Wear Out Too Fast?
If your Yellow Jacket stump grinder teeth are wearing out faster than expected, don’t assume the teeth themselves are the problem. Take a closer look at what you’re grinding, how you’re feeding the cutter into the stump, and whether the teeth and their pockets are still in good shape. These details are easy to overlook, but they can make a real difference in how quickly your teeth wear down.、
-
Abrasive Soil and Hidden Debris

Sometimes the difference comes down to where you’re grinding. A stump in relatively clean soil is usually less demanding on cutting teeth than one surrounded by sandy ground, gravel, or dirt packed around the roots. As the cutter works close to the ground, abrasive particles can repeatedly contact the cutting edges and gradually wear them down.
Stones and buried debris can cause more sudden damage. A tooth may strike a hard object and chip its carbide tip or damage other parts of the cutting assembly. If your Yellow Jacket stump grinder teeth are wearing faster than expected, look for these signs:
-
Faster wear on certain jobs: Teeth wear noticeably faster when grinding stumps in sandy or gravelly ground.
-
Chipped or damaged carbide tips: Individual teeth show chips or impact damage rather than gradual, even wear.
-
Uneven wear across the cutter: A few teeth look significantly more worn or damaged than the others, which may warrant checking for localized impacts or other mechanical issues.
Before assuming the teeth are the problem, consider what lies around and beneath the stump. Remove loose rocks and debris from the work area where practical, and avoid forcing the cutter through material it was not designed to handle. You cannot eliminate every buried obstacle, but recognizing abrasive ground conditions can help you adjust your approach and reduce avoidable wear.
-
Excessive Cutting Load and Aggressive Operation
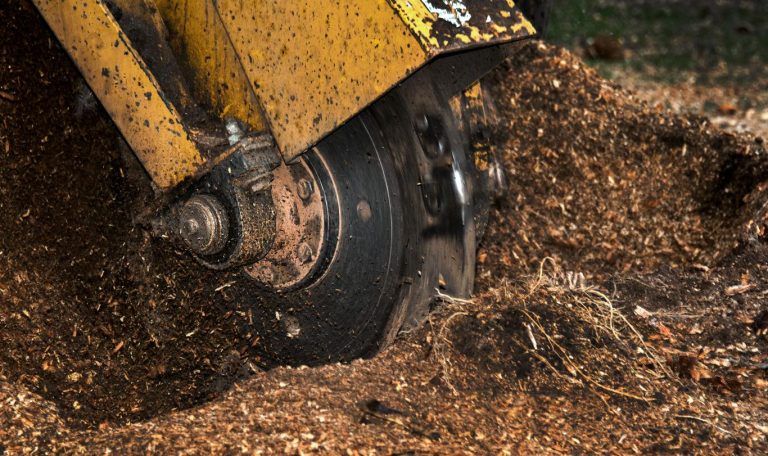
Trying to remove a stump faster by taking bigger cuts can backfire. When you push the cutter too hard into the wood or try to grind too much material in one pass, the teeth have to work harder to break it down. This can increase impact loads on the cutting edges and put extra stress on the teeth and their mounting components. Over time, that added strain can contribute to premature wear or damage.
Pay attention to how the machine behaves during cutting. A change in operating conditions can tell you when you’re asking too much of the cutter. Watch for these signs:
-
The cutter struggles to get through the wood: You may be taking too large a cut or working at a feed rate the machine cannot handle comfortably.
-
Unusual vibration or repeated impacts: These can indicate excessive cutting load, damaged teeth, or another mechanical issue that needs inspection.
-
Frequent adjustments to keep the cutter moving: If you constantly need to change your approach to maintain cutting progress, the cutting depth or feed rate may be too aggressive for the conditions.
The solution isn’t necessarily to slow everything down. Instead, use controlled passes and let the cutter work within the machine’s capacity. Follow the operating instructions for your grinder, and adjust your cutting approach to suit the stump’s size, wood condition, and any obstacles around it. If vibration continues even after reducing the cutting load, stop the machine and inspect the teeth and cutting assembly before continuing.
-
Worn, Damaged, or Improperly Positioned Teeth
Not all stump grinding teeth wear at the same rate, but if some teeth are in noticeably worse shape than others, it’s worth taking a closer look. A chipped carbide tip, a rounded cutting edge, or a loose tooth can affect how the cutter engages with the wood. The remaining teeth may then have to do more of the cutting, which can lead to uneven wear across the cutter.
Tooth position and maintenance matter, too. Some Yellow Jacket tooth systems are designed to let you rotate or reposition teeth to use another cutting edge. If your system supports this, follow the manufacturer’s instructions for when and how to reposition them. Installing a tooth incorrectly or failing to secure it properly can affect cutting performance and may damage the tooth or its mounting components.
When inspecting your teeth, look for these signs:
-
Rounded or badly worn cutting edges: The teeth may no longer cut as effectively, making grinding less efficient.
-
Chipped or missing carbide: Impact damage or demanding ground conditions may have damaged the cutting tip.
-
Loose or incorrectly positioned teeth: Check for movement, incorrect seating, or other installation issues according to the equipment manual.
-
Uneven wear across the cutter: Compare the teeth rather than assuming one damaged tooth tells the whole story. Uneven wear can have several causes, including differences in cutting exposure, localized impacts, or mechanical problems.
Replace damaged teeth and correct any installation issues before continuing to grind. If your teeth are designed to be rotated, inspect all cutting edges and reposition them only as directed by the manufacturer. If new or correctly positioned teeth continue to wear unevenly, inspect the tooth pockets and other components rather than repeatedly replacing the teeth without finding the cause.
-
Worn Tooth Pockets and Retention Components
If you’ve replaced worn teeth but the new ones still seem to wear out quickly, don’t overlook the pockets that hold them in place. A tooth can only work as intended when it sits securely in its holder. If a pocket is worn, cracked, or damaged, the tooth may not seat correctly, potentially affecting its position and how it engages with the wood.
The retaining components matter just as much. Depending on the Yellow Jacket system, these may include the hardware or other parts used to secure the tooth. If a retaining component is worn, damaged, or improperly fitted, the tooth may become loose or fail to stay in its intended position. Simply installing a new tooth won’t fix an underlying problem with the mounting assembly.

During inspection, look for a few warning signs:
-
A tooth that does not sit securely: Check for looseness, unusual movement, or poor seating in the pocket.
-
Visible pocket damage: Look for cracks, deformation, or wear in the area that supports the tooth.
-
Repeated problems with replacement teeth: If the same position develops issues after a new tooth is installed, inspect the pocket and retaining components rather than replacing the tooth again without further checks.
Before installing replacement teeth, clean the mounting area and inspect the pocket and retaining components for damage. Follow the equipment manufacturer’s instructions for checking fit, securing the teeth, and deciding when parts need replacement. If a pocket is worn beyond its service limits, replacing the tooth alone may not restore proper fit or reliable operation.
-
Delayed Maintenance and Missed Inspections
Tooth wear rarely fixes itself, and putting off inspections can turn a manageable maintenance issue into a more expensive repair. A tooth that’s already worn or damaged may continue cutting poorly, and if you leave it in service too long, you may also overlook problems with its pocket or retaining components. By the time the cutter’s performance noticeably drops, more than one part may need attention.
This is especially easy to miss when you’re busy moving from one stump to the next. Instead of waiting until grinding becomes difficult, make tooth checks part of your regular routine. Pay attention to:
-
Changes in cutting performance: If grinding takes longer than usual or the cutter no longer works as expected, inspect the teeth rather than pushing through the job.
-
Visible wear or damage: Look for rounded cutting edges, chipped carbide tips, loose teeth, and damaged pockets.
-
Teeth due for rotation or replacement: If your tooth system allows rotation, follow the manufacturer’s recommended procedure and replace teeth that have reached their service limits.
Keeping a simple record of inspections and replacements can also help you spot patterns. If teeth wear out unusually quickly after certain jobs, compare the ground conditions and operating practices rather than automatically replacing the entire set. Always follow the grinder manufacturer’s maintenance schedule and stop the machine before inspecting or handling the cutting assembly, using the specified shutdown and isolation procedure.
How to Diagnose Excessive Stump Grinder Tooth Wear
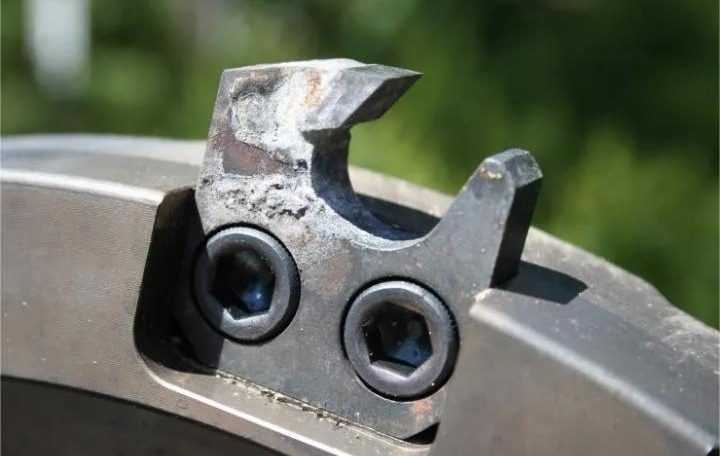
When stump grinder teeth keep wearing out sooner than expected, it’s tempting to order a new set and get back to work. But before you do, take a look at the old teeth. The way they wear can tell you quite a bit about what’s going on. Are the tips gradually wearing down, are a few teeth badly chipped, or do some look much worse than the rest? Those differences matter, because the fix isn’t always another set of teeth.

-
Look Closely at the Cutting Tips
Start with the carbide tips. If they’re worn smooth or rounded, the teeth may simply have reached the end of their useful life. Chipped or broken tips are a different story. They may point to hard impacts, rocky ground, or cutting conditions that put too much stress on the teeth.
Don’t judge a tooth by appearance alone, though. Compare its condition with the manufacturer’s wear limits and replacement guidance. A tooth that still has some carbide left may no longer be suitable for continued use.
-
See Whether the Wear Is Even
Take a look across the cutter instead of focusing on just one tooth. If most teeth look similar, the wear may be related to the amount of work they’ve done or the ground they’ve been cutting. If a few are much more worn than the others, it’s worth finding out why.
Check where those teeth sit and whether they’ve taken repeated impacts. Also look for loose or incorrectly seated teeth. Uneven wear doesn’t automatically mean something is installed wrong, but it gives you a reason to investigate before fitting replacements.
-
Don’t Overlook the Pockets
A new tooth won’t solve every problem. The pocket that holds it can wear or become damaged, and retaining components can also loosen or deteriorate. If a replacement tooth doesn’t sit securely, or the same position keeps giving you trouble, look beyond the tooth itself.
Check for visible cracks, deformation, unusual movement, or damage around the mounting area. Follow the machine manufacturer’s instructions for assessing the fit and deciding whether a pocket or retaining component needs replacement. If the mounting area is damaged, don’t simply fit another tooth and carry on.
-
Think Back to When the Problem Started
Sometimes the clearest clue is what changed before the wear became noticeable. Did the teeth start wearing faster after working in gravelly soil? Were you tackling larger stumps than usual? Did the machine begin vibrating more, or did grinding become noticeably harder?
Think back over recent jobs and compare what you remember with the condition of the teeth. Even a basic record of when teeth were inspected, rotated, or replaced can help you spot a pattern. If the same problem keeps coming back, don’t keep replacing teeth without checking the underlying cause.
Before inspecting the cutter, shut down and isolate the machine according to its operating manual. If you find damaged pockets, loose components, or persistent abnormal vibration, address the problem before returning the grinder to work.
Choosing Replacement Teeth for Demanding Stump Grinding Conditions
If your stump grinder teeth keep wearing out too quickly, it’s worth taking a closer look before ordering replacements. Buying a different set won’t necessarily solve the problem if the teeth don’t suit your machine or the conditions you’re working in. Start with fit and compatibility, then consider the cutting design, materials, and cost of keeping the grinder running.

-
Make Sure the Teeth Fit Your Grinder
Don’t choose replacement teeth based on appearance alone. Teeth that look similar may have different dimensions, mounting arrangements, or seating requirements. Check your grinder’s make and model, along with the specifications of the existing tooth system, before ordering.
If you’re replacing Yellow Jacket teeth, confirm that the replacement is compatible with your particular setup. A tooth that doesn’t fit correctly can create installation problems and may not perform as intended.
-
Look Beyond the Material Name
Carbide is commonly used in cutting teeth because of its hardness and wear resistance, but the material alone doesn’t tell you how well a tooth will perform in the field. Tooth geometry, carbide quality, overall construction, and the way the tooth engages with the material all matter.
Think about the conditions you usually work in. A tooth used in abrasive soil faces different wear demands from one exposed to repeated impacts against hard obstacles. Choose a design intended for your application, and compare the manufacturer’s specifications rather than relying on broad claims about durability.
-
Match the Tooth to Your Working Conditions
Consider the type of stumps you grind and the ground surrounding their roots. If you regularly work in sandy or gravelly soil, abrasive wear may be a major concern. If hard impacts are more common, inspect the tooth design and its suitability for those conditions.
Also, don’t overlook the rest of the cutting assembly. Even a suitable replacement tooth can develop problems if its pocket or retaining components are worn or damaged. Check these parts before installing a new set.
-
Compare the Cost Over Time
The cheapest tooth isn’t always the least expensive option in the long run, but a higher price doesn’t automatically mean a longer service life either. Consider the purchase price alongside how often the teeth need replacing, the time required for maintenance, and whether compatible replacements are readily available.
Keep track of how long your current teeth last under similar working conditions. That gives you a more useful basis for comparing alternatives than relying on general claims about wear resistance.
If you’re looking for replacement options for forestry mulching and land-clearing equipment, you can explore JYF Machinery’s carbide mulcher teeth. Check the product specifications and confirm compatibility with your equipment before choosing a replacement.
Final Thoughts
When your Yellow Jacket stump grinder teeth wear out faster than expected, replacing them is only part of the solution. Take a closer look at the wear pattern, the ground conditions, and the condition of the parts holding the teeth in place. Once you understand what’s causing the problem, you can make better decisions about maintenance and replacement instead of repeatedly buying new teeth and hoping they last longer.
Frequently Asked Questions
-
How Often Should You Replace Yellow Jacket Stump Grinder Teeth?
Yellow Jacket stump grinder teeth should be replaced when they become too worn or damaged to cut effectively, rather than after a fixed number of hours or jobs. If you regularly grind stumps in sandy or rocky soil, you may need to replace them more frequently than when working in less abrasive conditions. Check the teeth before each job for worn cutting edges, chipped carbide tips, and other damage. If grinding becomes less efficient or the teeth show significant wear, inspect them against the manufacturer’s replacement guidelines and install new teeth when necessary.
-
Can You Rotate Yellow Jacket Stump Grinder Teeth Instead of Replacing Them?
Yes, but it depends on the design of your Yellow Jacket stump grinder teeth. Some stump grinder tooth systems allow teeth to be rotated or repositioned to use another cutting edge, while others require replacement when the cutting edge wears out. Check your specific tooth model and the manufacturer’s instructions before rotating or reinstalling any teeth. If a tooth is chipped, cracked, or severely worn, replace it rather than continuing to use it.
-
What Information Do You Need to Order Yellow Jacket Stump Grinder Teeth?
To order the correct Yellow Jacket stump grinder teeth, prepare the following information before contacting a seller:
-
Grinder make and model: This helps identify the tooth system used on your machine.
-
Tooth model or part number: Check the existing teeth or your equipment documentation for a part number.
-
Tooth dimensions and mounting details: If the part number is unavailable, measurements and photos of the existing teeth and mounting arrangement can help with identification.
-
Replacement requirements: Let the seller know how many teeth you need and whether you are replacing individual teeth or a complete set.
Before placing your order, confirm that the replacement teeth match your grinder’s specifications and mounting system. If you’re unsure which teeth you need, provide the seller with your machine details and clear photos of the existing teeth to help verify compatibility.